Silver Linings & Watermelon Popsicles

As much as we’ve been celebrating around here over the past few weeks, my little ones have been working through some pretty big changes in their little lives.  While my daughter watched some of her best friends graduate from senior kindergarten and out of her little school, my son spent his last few days in class with his best buddies knowing that they’ll all be at different schools next year.  My attempts to soothe his feelings with promises of play dates and shared after-school activities were met with comments like “play dates are not the same thing as being at school all day together”.  As a mom, my heart felt as broken for my little ones as theirs felt broken for what they were experiencing.

All this change for them has also shown me just how fast they’re growing up and how my role is going to be changing too.   Have you read that post that keeps circulating on Facebook?  The one about how there’s always a last time for something as you’re raising your kids?  Well, this morning, after my son took a big fall, and I pulled him onto my lap to comfort him, it really struck me that it won’t be much longer before he will simply be too big physically for me to do that – and perhaps the only reason I still can is because of all the time I spend in the gym.

And so, for the past few weeks, I’ve been busy shepherding us all through this period of change.  And the metaphor that I’ve been relying on most to explain all of this change to myself, and to the kids: Silver Linings.

You see, a silver lining can be described as this:

silver lining

n.

hopeful or comforting prospect in the midst of difficulty.

I want to teach my little ones, as much as I want to remind myself, that as we make our way through the difficult times in life, there will be a light at the end of the tunnel, that things will start to get better, and that it’s never too long before we can see the silver lining!

Of course, with the kids, I’ve also been relying on diversionary tactics when I find them getting a little to “stuck” in their emotions.  And the best way to divert my kids attention, is to get them into the kitchen.

With the recent wave of hot weather, my daughter has exclaimed pretty much every afternoon “today would be a perfect day for a popsicle!”.  And so . . . we made popsicles!  Yes, I know, this is not revolutionary in any way.  But the kids have discovered the joys of giant freezies and they’ve been exposed to ice cream trucks at end of the school year celebrations, which combined, make a traditional popsicle a hard sell in my house right now.

Ownership of the great popsicle project, however, equalled success in both of them thinking they were having a real treat . . .

Strawberry and Watermelon Popsicles

  • Servings: 4-6
  • Difficulty: easy
  • Print


Ingredients

  • 1 cup chopped strawberries, leaves and stems removed
  • 1-2 cups cubed watermelon (about 1/8 of a whole watermelon
  • 1/4 c plain yogurt (I used Kefir)
  • 1 tsp of liquid organic honey (this is totally optional and totally not necessary)

Directions

  1. Throw all the ingredients into a blender and process until smooth
  2. Pour into popsicle molds and freeze (I got mine at Dollarama . . . )
  3. Enjoy on a day that is just “perfect for popsicles”


What, If Anything, Would Compel you NOT to Eat Processed Food for One Week

I read a quote the other day by Edward Stanley that said:

“Those who do not find time for exercise will have to find time for illness.”

And over the course of the last week, I’ve watched a new documentary on Netflix Sugar Coated.

When exactly did the consumption of processed food, almost to the complete exclusion of real food, and the inability to engage in a moderate amount of exercise on a regular basis, become so normalized that the thought of giving up processed foods made you do one of either 2 things – disregard anything I have to say in this post, or freak out and wonder how on earth that would even be possible.

Over the last few years, enough people have asked me how I lost weight or got to look the way I do, I’ve come up with a standard response: “I don’t eat sugar, I don’t eat processed food, and I limit alcohol”.  By the time I’m done that short little sentence, most people have stopped listening, and if they haven’t, by the time the hear the bit about limiting alcohol, they’re ready to change the subject.

Here’s the thing though . . . when I have these conversations, part of me wants to throw my hands up and scream.  If we feed ourselves a diet of predominantly processed, nutrient-deficient, non-organic, genetically modified diet, what do we expect the end result to be?  It can’t be health and vitality, because nothing in this world can survive long-term without solid nutrient-dense foods.

That being said, there are a few people that have been willing to hear me out, but then start to question how it’s possible to eat that way and not spend all my time in the kitchen.

Well, my simple answer to that is with another quote:

“It’s not about having time.  It’s about making time.  If it matters, you will make time” (Anon).

So, I thought I would outline for all of you, just how it is that I “find the time” to make sure my family gets the healthiest, most nutrient-dense food I can give them so we can do our best to limit disease and our risk of contracting disease later in life (like cancer, diabetes, etc.)

It all starts on Sunday.  I have (as I’ve talked about before), a dry-erase magnet on my fridge where I write down what we’re having for breakfast and dinner for each of the days of the upcoming week.  On Sunday, before we do a big grocery shop, I plan out our meals for the week based on what we have going on that week.

You can absolutely find healthy foods at your local grocery store – while meats that are traditionally raised without the use of antibiotics, hormones, or feed that contains genetically modified ingredients certainly taste better and require a little bit more time to source (we visit the St. Lawrence Market every Saturday to stock up on meats) – you can get at least antibiotic and hormone free meats at all the major grocery stores now.  You can also get lots of organic fruits and vegetables there too, while you’re at it.  Sure, fruits and vegetables from your local farmers market (where there farmers selling their actual crops and not just produce that has been sourced from elsewhere) are a better choice, but until you’re ready to take that next step – just shop at your local store.

Sundays are often the day when the Husband and I will batch cook things that we might need for the week.

Sundays are also often the day when I make a batch of my chocolate chip cookies so the kids will have a healthy snack for the week.

For example, I bought 24 chicken thighs at the grocery store yesterday morning, popped them in a simple marinade when I got home, and the Husband barbecued them for us at lunchtime.  We all had some for lunch, but I now have 20 leftover to use for my lunches, and the kids lunches this week.

Each night, Sundays included, as soon as the dinner dishes are done,  the Husband and I prep some of what will be needed the next morning.  That might entail washing and prepping fruits for our daily smoothie or veggies for the kids and the Husband.  I also use this time to make sure the kids’ backpacks are packed and ready to go for the next day, and on Sundays in particular,  I tend to organize any activity bags we might need for the week (swimming, skating, hockey).

I suppose I’m lucky in that Husband and I make a great team in the mornings.  While I’m getting ready, he makes the kids’ breakfast and the smoothies for all of us.  And while he’s getting ready, I assemble the kids’ snacks, a bag of veggies for him, and my salad while simultaneously cooking eggs for my breakfast.  If he’s not around, the kids and I have the same breakfast at the same time, and snacks and my lunch are assembled after.

Lately, the kids have been REALLY into cooking, and helping me get the things I’ve been adding to my daily salad from the garden.  So, I’ve been eating with them we’ve been making my salad and their veggies (they have to have one snack of veggies a day, house rule).

Do your kids help you cook?  If not, why not?  It took some supervision at first, but my 5 year old can now cut up pretty much any vegetable, whether it’s going in a salad or her snack container.  Not only is it more fun to have the kids in the kitchen with you, I’ve found they’ll eat better, knowing they’ve prepared it, and they’re learning a life skill . . .To minimize the risk of accidents, they each have their own knife and they each get their own cutting board.

Depending on what we’re having for dinner that night, I might have the kids help me cut up broccoli or carrots in the morning so they are ready to go for dinner.

I’m also lucky in that both my kids have their lunches provided for them at school – so aside from my salad, and their snacks, I don’t need to do any other food prep in the morning.  All in all, the entire time I spend in the kitchen in the morning is 30 minutes, tops.

Again, depending on the day, if I’m at home before I have to pick the kids up from school, and I’m making a “recipe” for dinner, I might do some dinner prep before I leave – pre-measure ingredients, or chop up things like onion or other veggies.

Once we’re all home, I usually start dinner prep at 5:30.  If we’re having something that doesn’t require much assistance, the kids are in charge of setting the table, while I get things started.  But again, since they love being in the kitchen so much, they’re often in there with me chopping, mixing, even cooking on the stove.  Dinners are usually a protein and 2 veggies.  Because I menu-plan and shop on Sundays, I rarely need to go to the store during the week, and my total food-prep time is no longer than if I were making a pre-packaged meal from the grocery store.

I will stress that although we are only 4 people, I usually make enough food to serve 6 – that way I have leftovers for my lunch, or to freeze for when I’m in a pinch.  And when I make things like my chicken fingers, I make TONS, and freeze them.  The kids LOVE making those with me, so why not make a double or triple batch . . . it doesn’t take double or triple the time, and will save time down the road.  Also, when I’m making things like roasted sweet potatoes, I make lots – there’s nothing I love more in a salad then roasted sweet potatoes (if you haven’t tried it . . . you have to  . . . it’s delicious).

And that . . . well, that’s how I “find” the time to eat well.

Before I conclude, I want to add in that I know many of you believe that it’s simply too expensive to eat organically.  To that I will say . . . once you realize how much better you feel, how much healthier you are when you start eating this way, it becomes an easy choice.  But more importantly, healthcare is expensive.  Far more expensive that eating organically ever will be.  Medicines, parking fees to visit doctors, etc. . . . the costs add up . . . wouldn’t it be better to spend perhaps a little bit more nourishing yourself now than pay all the medical bills if/when disease sets in?

And so, given what I’ve had to say today, what would compel you not to eat processed foods for one week???  Because, I bet that once you start, you’ll keep at it for a lot longer than one week!

And now for my new favourite chicken recipe – the one I made yesterday!

IMG_5875

Easy Lemony-Herbed Chicken (thighs)

  • Servings: 4-6
  • Difficulty: easy
  • Print


Ingredients

  • 2 tbs red wine vinegar
  • 1/2 cup olive oil
  • juice from one lemon
  • 3 clove minced garlic
  • 1 shallot (minced)
  • handful chopped fresh herbs (i’ve used rosemary, thyme, basil . . . use whatever you have on hand, you like, sounds good to you)
  • -salt and pepper to taste
  • chicken – use whatever you want – but just enough to serve about 4-6.

Directions

  1. In a medium bowl, add in all the ingredients and mix with a spoon, fork, whisk . . . whatever.
  2. Add in your chicken, and using some tongs, toss it so that all the chicken pieces get well coated with the marinade.
  3. Let the chicken sit for a few hours, all day, overnight.  When you’re ready, cook the chicken however you want – I’ve been barbecuing lately.  But you can also throw it into a pan and bake it in the oven at 350 until it’s no longer pink inside.  Or you could sauté it on the stove top.

Have we Forgotten How to Cook (And in the Process Have we Forgotten What Real Food Tastes Like?)

I have always loved cooking and as such, have involved the kids in cooking since they were old enough to stand on a chair and hold a spoon.  Both kids enjoy looking at cookbooks and picking out recipes to make – my son is known for bringing home cookbooks from his school library instead of novels.  This year has seen them learn how to chop vegetables and start to man the cooking of simple things on the stove.  All of which has been great.  But …

Our herbs and salad greens finally started to take off this week, which meant I was much more comfortable taking cuttings to add to our meals.  Every morning, the kids and I go out to the back porch and snip some kale, parsley an basil to throw into my salad, which turns into them each taking a taste of the various things we have growing.

Yesterday, we got a bit too aggressive with our basil cuttings, so I had leftover which I decided to throw into a pan with some tomato and kale and eggs for my breakfast (for those of you that are curious, I melt a generous teaspoon of coconut oil in a pan, add in some chopped frozen kale – I’m using up the last of the frozen stuff for my morning eggs and when it’s gone, I’ll start using the fresh stuff from my garden – a diced tomato and whatever herbs I may have picked.  When the veggies are warmed through and soft, I crack 2 eggs into the pan, stir them around so the whole thing becomes a sort of scrambled egg omelette.  It’s not the most elegant of meals, but it does taste AMAZING).  When the eggs were cooked, I gave each kid a taste.  And immediately they wanted their own, even though they had each just had their own fried egg.  Seeing the excitement on their little faces as they realized just how good food could taste was a wonderful moment for me.

It is so hard today not to get overwhelmed by the images of stunningly gorgeous food and the millions of recipes that bombard us every day – recipes that when you dig a little deeper turn out to contain multiple hard-to-find ingredients, take a relative eternity to prepare, and end up either not working, not looking anything like the pictures you’ve seen, and/or not tasting particularly good.  Then there are all the articles telling us how we should eat, what we should eat, and when we should eat it in order to optimize our size and our health.  Add in working parents, kids, homework, after-school activities, and it’s hard not to just throw up your hands, run to the local grocery store, buy some pre-prepared meal and throw it on the table for the kids, and maybe a bit later in the evening for the adults.

But if we strip everything back to the very basics – forget about making those ridiculous recipes – and instead go back to cooking simple, good food that tastes good, not because it’s filled with additives and sugar and artificial flavours, but because it’s made with the best ingredients that taste good on their own.  If we can re-learn how to cook that way, maybe we’ll start to remember how good real food tastes, and we’ll start craving the prepared/processed food less (which in turn will make us healthier, leaner and overall happier).

And while this may be very optimistic, I’m hoping that by instilling in my kids at an early age, how amazing real food tastes, how amazing it is to use ingredients from our own backyard, and how fun it is to cook together, as they grow up, they will continue to crave this good food over the chemical-laden food choices they will be exposed to.  And maybe, they might even convince some of their friends that “real” food eating really is better.

And now for the “recipe” part of this post . . . Last weekend, the Husband picked up a ton of chicken thighs – the kind that have both bones AND skin.  He made a simple marinade out of lemon juice, olive oil, salt, pepper, and rosemary from our yard.  The thighs all got barbecued, some were eaten for dinner that night, and the rest were used for dinner and my lunches the following week.  Tuesdays are a quick turn-around day for us – meaning we don’t have much time between getting home from school and needing to be back out the door for baseball.  So, last week, I used the leftover chicken as protein portion of our dinner (it was actually a neat experiment for the kids comparing how the cold chicken tasted versus how it had tasted when it was fresh off the barbecue).  I chopped up a plate of veggies for us all, and then I made a side dish of my favourite pesto sauce that I served over pasta (I do allow us one pasta night a week.  We can all tolerate gluten relatively well, as I’ve said before, and everyone loves it.)  The kids LOVE peeling and chopping garlic and picking basil from our backyard (it was supplemented with some from the store), and then getting to use the Cuisnart made for a fantastic 20 minutes in the kitchen with them – time so much better spent than having me alone in the kitchen and them watching a show or just hanging around.

Pesto Sauce

  • Servings: 4-6
  • Difficulty: easy
  • Print

Ingredients

  • 1 cup fresh basil leaves
  • 2/3 cup grated Parmesan cheese (please use the good stuff)
  • 1/2 cup olive oil
  • 1-3 cloves of garlic (this depends on how garlic-y you like things, what your kids will tolerate, and how big your cloves of garlic are – use your discretion)

Directions

  1. Rinse off the basil leaves, and throw them into the bowl of a food processor.  Add in the cheese and garlic.  Pulse a few times until the basil has been chopped up finely and everything looks pretty well combined.
  2. Through the feeder tube of the food processor, with the food processor running, drizzle in the olive oil.  Keep the processor running until all the olive oil has been added and the sauce looks well mixed.
  3. Serve this over pasta, quinoa, tomatoes, or just as a salad dressing . . .it’s delicious!


Finding Joy in My Garden
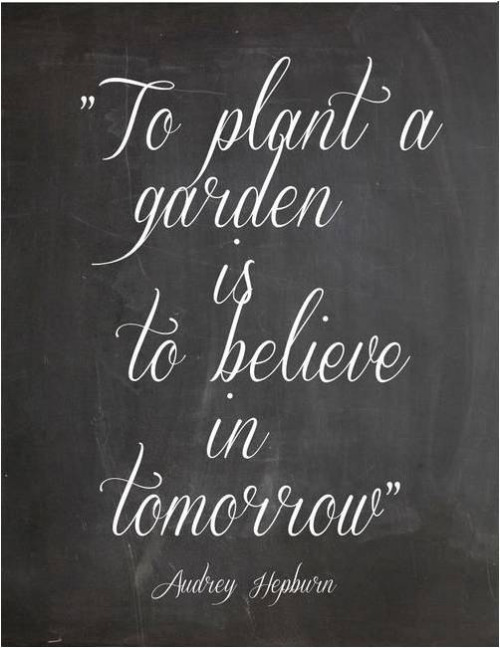
I’ve always loved spending time in the garden.  My mom kept a gorgeous garden at the house I grew up in, and over the years I have had the pleasure of attending lots of garden talks with her.  I was so excited when the Husband and I bought our house – I couldn’t wait to start my own garden.  But as many good intentions as I may have had over the years, my garden just never really took shape.  Until this year.

Since the early spring, I found myself searching images of English gardens on Pinterest, reading plant catalogues from my favourite nurseries, and planning how I might change my garden.  And once planting weather arrived, I’ve spent more time than ever planting, weeding, and tending to my garden.  And I’m loving every minute of it.  So much so that I even skipped the gym on Monday just to spend more time gardening (although who wouldn’t want to spend time amongst these beauties??)


This year, I’ve even found space for a little veggie garden behind my back flower bed (this was obtained through a mis-guided attempt to “trim out” the dead branches of a cedar hedge – we ended up taking out the hedge, putting in a fence, and tripling the size of the back flower bed).

image

Yup . . . roses, kale, pepper, and melons all planted amongst each other . . . not the most conventional, BUT, I am hoping the roses will grow and provide a nice cover to the fence.  And I let the kids pick what plants they wanted . . . so we have kale, and peppers, and melons.  And tomatoes.  Lots and lots of tomatoes . . .

Anyway, in my nightly searching on Pinterest, I came across the Audrey Hepburn quote above, and my obsession with gardening this year started to make a bit more sense . . . At at time in my life when I’m filled with more hope and excitement for the future, it’s no wonder I’ve been loving my garden.

image

The other upside to all this gardening has been how it’s gotten me excited about cooking again.  With all the craziness of the kids’ end of year stuff, I’ve been relying on staple recipes that I know I can make quickly and that I know the kids will eat (quickly).  This year, thanks to the coach, I discovered Richter’s Herbs, and purchased from them an awesome selection of herbs which I now have growing on my back porch.

image

Every morning, the kids and I go out to water our herbs . . . but also to cut some to add to the salad I make for my lunch each morning.  These herbs have been put to good use in our dinners lately too!  Earlier this week I made a wicked pesto sauce that I served with pasta for dinner, and last on Friday I made a crowd-please app for a pre-party I had at my house.  It’s the easiest app you could ever make, takes literally 5 minutes to prepare if not less, and everyone seems to love it . . . here’s my take on it:

Easy Peasy Goat Cheese App

  • Servings: lots
  • Difficulty: easy
  • Print

Ingredients

  • soft goat cheese (I used a smaller quantity for this, but you can use as much or as little as you’d like)
  • 1 shallott or a few green onions
  • chives
  • ground black pepper
  • red pepper flakes
  • olive oil

Directions

  1. Place your goat cheese in a small serving bowl or dish that fits the size of goat cheese that you’re using.
  2. If you’re using green onions, wash and peel the outer layer and then finely slice the white and green part of the onion.  If I use a small amount of goat cheese, I might use 2 or 3 green onions.  If I’m using a larger amount, I’d double that and use 4-6.
  3. Sprinkle pepper and red pepper flakes over the cheese.
  4. Pour olive oil over the cheese so that it pools in the bottom of the bowl around the cheese.
  5. Keep in the fridge until about 30 minutes before you plan to serve it – then take it out and let it warm up a bit.  Serve with crackers or sliced baguette.

#100DaysOfLookingToTheSky & Some New Super Quick, Super Easy Recipes


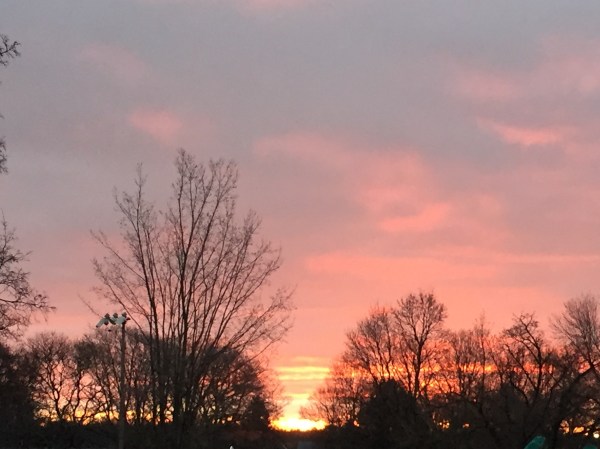
The universe works in magical ways sometimes . . .

In my last post, I talked about how much happiness I derived from watching the sun rise with my kids each morning while I was on vacation.

Shortly after, I came across the #the100dayproject . . .

And an idea was born . . .

For the next 100 days, I’m going to take a picture of the sky.  It might be a photo of the sun rising . . . it might be of rain clouds . . . it might be of the sun setting.  From now until July 27th, I’ll be collecting these photos under #100daysoflookingtothesky.  I’m excited about this project.  Watching the sky is nothing if not life affirming.  I suppose that’s why so many phrases and sayings about the sun, the sky, the moon (the sun always rises, even the darkest night will end, the sky’s the limit . . .).  But I digress.  Like I said, I’m excited about this project and where it might lead me . . . metaphorically and physically.  And today could not have been a better morning to start the whole thing off . . . As I ran laps around our neighbourhood park early this morning, I captured the gorgeousness of the sun rising, and I have been in a happy frame of mind ever since.

And now to leave the esoteric behind and focus for a minute on the practical.  Spring is that magical time of year when activities like hockey and skating should be wrapping up with sports like soccer and baseball taking their place.  Instead, I’ve found the next few weeks will have us playing hockey, skating, AND playing soccer and baseball . . . which means, dinners in our house need to be able to get on the table quickly AND they have to be consumed quickly by everyone.

While it can be tempting to answer the call of the mac & cheese boxes that seem to scream my name from the pantry, I remain 100% committed to feeding myself, and the Husband and the kids real foods that aren’t processed and that contain minimal amounts of gluten and sugars.  So, what is it that we’re eating???  Well, last week we got home at 5 and I had 45 minutes to get my son fed and out the door . . . so I made salmon cakes with an avocado cream sauce, roasted cauliflower and steamed carrots.  In fairness, I did have 5 spare minutes in the afternoon before I had to pick the kids up from school, so I got the cauliflower chopped then so it would be ready to toss in the oven when we got home . . . but really, that only took an extra 5 minutes . . .

Baked Paleo Salmon Cakes

  • Servings: 4-6
  • Difficulty: easy
  • Print

Ingredients

4 tins of organic salmon (I use the Raincoast Trading brand)

3 eggs

1/2 tsp smoked paprika

salt & pepper to taste

2 tbs coconut flour

Directions

  1. Preheat the oven to 350.
  2. In a bowl, beat the eggs, paprika, salt, pepper and coconut flour.
  3. Drain the excess fluid from the salmon and add it to the bowl.
  4. Mix well so that the egg and salmon is completely combined.
  5. Using a large ice cream scoop, drop about 1/3c of the mixture onto a baking sheet lined with parchment paper.  I make about 7 patties from this recipe.
  6. Bake in the oven for 15 minutes.  Remove the baking sheet from the oven, flip the patties over, and bake for another 10 minutes.

While the salmon patties were cooking, I threw a cookie sheet with the chopped cauliflower (which I had tossed with olive oil, salt and pepper) into the oven too.  I also used the cooking time to scoop the flesh out of one avocado.  I put it into a bowl and mashed it well with a fork.  I added a few tablespoons of our kefir and stirred it around till it was well mixed – you could use sour cream, greek yogurt, plain yogurt in place of the kefir).  And I put a pot on the stove to steam some carrots to complete the meal.

IMG_1556

Yes, everyone ate this meal . . . everyone enjoyed eating this meal . . . and I was one happy mom.

Best part . . . I could use one of the leftover patties for my lunch the next day, and the rest of the leftovers were frozen so we could have a SUPER quick meal at a later date . . .

What’s in the Way . . . Is the Way

A few weeks ago, I read this great post on the Zen Habits website entitled “Our Everloving Quest to Control Our Lives”.  What stuck with me from this post was the concept that just when we think we have achieved “control” over our lives, something happens to show us just how little control we have, which in turn can be quite disappointing . . .

Since the start of this blog and the start of the new school year, I have been working through this concept of letting go of (some) control and just letting the universe take over.  Ironically, it has been by implementing some set routines (I’m not ready to give up all my control yet . . .) that I’ve been able to do this.  Little things like menu planning, packing the kids snacks before I go to bed, packing all the activity bags on the weekend . . . all help to free up time so that I can spend the time I have with the kids, the Husband, myself in the best way possible.

That being said, I still face my daily struggles . . . especially in the mornings.  As I’ve said before, my kids wake up early.  Like 5am early.  And the Husband is up at 4:30 to go to the gym.  Which means, as a mom, I’m “on duty” before I’ve had any time to get myself organized.  With my re-newed focus on my nutrition, one area that needed attention was my breakfast.  In the hustle and bustle of having 2 kids up so early, getting their breakfast on the table, lunches (for me and the Husband) made, and everything else that goes on in a house in the early hours of the morning, my breakfast often gets put on the back burner (literally) until 7:30 (which, says the Coach isn’t exactly ideal).

Every morning for the last few weeks, I vow to get my breakfast first thing and then deal with everything else after.  And every morning, I get caught up in doing other things, and end up not eating until far too late.

As is so often the case, a phrase that I needed to hear came up several times over the last week: “What’s in the way is the way”.  Turns out this quote is actually the title of a book by Mary O’Malley that is reputed to be life changing (yup, I’ve added it to my reading list).  While I haven’t read the book, in reading about it, I found this excerpt from it:

“To open to the way things actually are, rather than always trying to make Life be what you think it should be, is the most courageous and healing thing you can do.”

I’ve always worked under the premise that the kids should be happy and occupied doing something before I set to work on the things I need to do.  But after thinking about this quote, I realized, I can have my cake (or at least breakfast) and eat it too . . .

image

This is the scene in our house in the mornings now.  No more kids off in the family room playing (aka asking for help from me every 2 minutes and preventing me from getting stuff done).  Instead they’re with me.  They love to peel, chop and portion out fruits and veggies.  So why not engage them in something they like doing that is simultaneously useful???  While they’re doing that, I have time to make my breakfast.  And then we can all sit down and eat together!

I’m not naive though.  I understand that just like everything, this won’t be the scene every morning.  BUT, as long as I’m prepared, I can roll with it and make things work.

And one of the ways I do that is by having lots of breakfast alternatives at the ready so if need be, I can forgo my usual eggs and veggies and grab something that I can get ready in just a few seconds.  Which brings me to my latest recipe . . . nut butter and oatmeal bars.  These work great as bars, or crumbled up and served with greek yogurt.  The Husband even likes these and has been known to snack on them (which is pretty high praise)!

Nut Butter & Oatmeal Bars

  • Servings: lots
  • Difficulty: easy
  • Print

Ingredients

1 500g jar of a nut butter of your choosing (I used crunchy peanut butter)

1/2 cup of raw honey

4 cups of organic oats

Directions

  1. In a small saucepan over medium-low heat, melt the peanut butter and the honey, stirring to combine.
  2. Measure the oats into a bigger bowl.
  3. Prepare a 9×18″ pan by lining it with parchment paper.
  4. Once the peanut butter and honey mixture is melted and well mixed, add it to the bowl with the oats and stir well so all the oats are coated in the mixture.
  5. Press the oat mixture into the pan using the back of a spoon or the bottom of a glass to really pack it in well.
  6. Put the pan in the fridge so the mixture hardens up.
  7. Store in the fridge – either cut into bars, or crumble up and store in a container to use in a pinch.  This makes a lot, so you may want to freeze some of it!

And Now to Get Honest

I talked yesterday about “getting real” – how eliminating processed foods, sugar and alcohol from your diet will make you feel better, you’ll have more energy, and most importantly, you will be doing the best you can to prevent disease, never mind that your body will likely start to change shape too.

Here’s the thing.  Making the decision to eliminate these foods from your diet isn’t going to change you overnight.  You won’t instantly feel better.  You won’t automatically have more energy.  Your body takes time to change.  And you won’t know how well you’ve done in terms of preventing disease until much, much further down the line.

In fact, you’re likely going to feel pretty horrible when you make the leap to a “real” way of eating.  Your body has to literally go through a detox process; yup, sugar addiction is a real thing.

And while the physical discomfort you might experience switching to this cleaner way of eating can be unpleasant, there are also mental/emotional consequences that don’t often get discussed.

Friday nights in our house, as I’ve talked about before, are usually a night to unwind, see family and friends, order in pizza and have some wine.  Oh . . . and the Husband is known for often bringing home cupcakes for everyone to enjoy too.  If we’re not hosting a pizza night, the Husband and I often go out for a date night to one of our favourite restaurants.

Personally, I find it extremely difficult to abstain from having a glass of wine when I’m surrounded by my friends who are all imbibing.  And while there are lots of gluten free pizza options, I have yet to find a place that delivers pizza with organic toppings, and logistically, making homemade pizza for more than just our family of 4 . . . well, that’s not exactly a relaxing evening!

I also find date nights hard . . . lingering over a cup of herbal tea at a restaurant where you’d normally be having an after dinner drink . . .well, it’s just not the same.

So I spent this morning alternating between moping and texting the Husband to see if we could come up with something “fun” for tonight that fit within our eating parameters.

And then it hit me.  We can have family date night.  Complete with homemade organic gluten free pizza and cupcakes!  While I don’t LOVE the gluten free crust mixes you buy at the grocery store, they will do – hopefully one day I’ll be able to come up with something that is a little better – and our fridge is already stocked with the rest of the ingredients we need.

Which brings me to the cupcakes.  Gluten free cupcakes made out of ingredients I have on hand . . . because . . .to be really honest, I do need to get to the gym today (one of my little ones has been sick this week which has meant no gym for me for most of this week) . . . and that taste as good as the store-bought ones.

Ok . . . so I’ll admit, I’m cheating a little bit.  Because I just happened to have 2 boxes of organic sweet potato flour in my pantry.  Why?  Because I’ve been meaning to make these cupcakes for a while.  I bought this brand from Barefoot Provisions – I checked all the major stores, Whole Foods, and all the small health food stores for it, and no one carried it – hence ordering it from the US.  So, unless you happen to have sweet potato flour in your pantry, you won’t be able to just whip these up.  That being said, these turned out pretty well – they will make an excellent snack for the kids (I’ll freeze what doesn’t get eaten and use them for Friday treat snacks) as they are nut free!  Oh . . . and they are free of refined sugar too!!!

IMG_9422

Sweet Potato Flour Chocolate Cupcakes

  • Servings: 12
  • Difficulty: easy
  • Print

Ingredients

1 cup sweet potato flour

1/2 cup arrowroot flour

1/2 cup milk

1/4 cup butter

1/2 cup cocoa powder

2 tsp baking powder

1 tsp baking soda

1/2 cup raw honey

2 tsp vanilla extract

1 tsp apple cider vinegar

2 eggs

Directions

  1. Preheat the oven to 350 and line a muffin tin with liners.
  2. In a small saucepan on low heat, add the butter, milk and honey.  Heat until the butter has melted.
  3. In a small bowl, beat the eggs until well combined.  Add in the vanilla and apple cider vinegar and mix again to combine.
  4. In the bowl of a stand mixer, add in all the dry ingredients.
  5. Once the milk/butter/honey mixture is melted and combined, add it, along with the egg mixture to the dry ingredients and mix well.  You may note some white lumps in the batter from the arrowroot powder.  Just let the mixer run for about a minute and these should all disappear.
  6. Fill the muffin tin with the batter and bake for about 20-25 minutes, or until a toothpick inserted into the centre of one of the cupcakes comes out clean (or the cupcake springs back when you push down gently on the top)
  7. Frost with your favourite frosting . . . or just eat plain!

Revised and IMPROVED Cookie Recipe
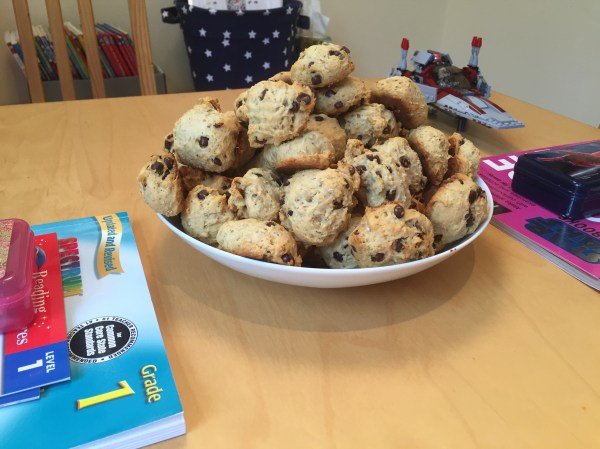
So, I’ve been making these cookies for quite a few weeks now, and the kids really do love them.  This week, I had the time to make the cookies, but had forgotten to set out the butter in the morning so it was soft enough to mix.  I really wanted to have the cookies made . . . so I just melted the butter.  While the butter was melting, I added the raw honey to the pot too – not sure if this made any difference or not . . .   I also had just a little bit extra vanilla left in the container – so I added that in as well, and turns out the cookies were even better!  So here’s the revised, improved and even more delicious cookie recipe.  Remember, you can use regular flour if you don’t have a gluten intolerance.  We seem fine in our house with gluten, so I don’t mind the kids having these in their lunch made from and organic wheat flour.  But feel free to use gluten free flour.

Revised and Improved Chocolate Chip Cookies

  • Servings: 60 cookies
  • Difficulty: easy
  • Print

Ingredients

3 cups flour

1 cup oats

1 tsp baking powder

1 tsp baking soda

2/3 cup Enjoy Life chocolate chips

4 eggs

1/4 cup raw honey

1/2 cup butter

3 tsp vanilla extract

Directions

  1. Preheat the oven to 350.  If you have a convection setting, feel free to use this.  I do as I cook all three sheets of cookies at once.
  2. In a small saucepan, melt the butter – you can add the honey to this pan as well and melt them both together.
  3. While the butter is melting combine the flour, oats, baking soda, baking powder and chocolate chips in a big mixing bowl.  You can also crack the 4 eggs into a separate bowl and mix them well with a fork to combine.
  4. Once the butter and honey have melted, add in the vanilla, mix to combine, and add this along with the eggs to the bowl with the dry mixture.
  5. Mix well to combine – you can do this by hand or in a stand mixer.
  6. Using a small ice cream scoop, or just 2 spoons, drop 1 tbsp of batter at a time onto cookie sheets (I’ve found no need to grease or line the cookie sheet with anything).  You should get 60 cookies, give or take, out of this batter.  I don’t bother to flatten or squash the cookies either – they will just rise up again anyway.
  7. Bake for 8-12 minutes – when I use convection and put all 3 trays of cookies in at once, they take about 10 minutes.
  8. ENJOY!

Working In Joy (aka Sprinkle Cake)

I mentioned before that this year, I decided to jump in with both feet and commit to Ali Edwards One Little Word workshop.  As Ali says on her site, “a single word can be a powerful thing”.  And yes, my word for the year is JOY.  There are a million reasons why I think this is the absolute perfect word for me to work with this year, but I think this quote sums it all up quite nicely:

Joy quotes

Or, as Danielle LaPorte put it,

“Happiness is like rising bubbles — delightful and inevitably fleeting.
Joy is the oxygen — ever present.”

While the start of a new year is supposed to be filled with the excitement of fresh starts, new challenges, and first steps on the path to being a better person, the first few weeks of this year for me have brought more than a few reminders of how life doesn’t always go quite as we had hoped for or planned.

But rather than focus on the dark clouds in life that are sickness and setbacks, I actively looked for the joy in the situation.  For there was joy in snuggling with my little one on the couch while she was home sick from school for two days.  And there was joy in making special dinners with the kids as the Husband worked late.  And there was even joy in changing up my gym routine when I wasn’t able to meet with the Coach (and for those that know me . . . i do NOT like a change in my gym routine . . . some things are sacred and not to be changed . . . EVER).

As the days of January tick by, I’m also starting to realize that it’s a whole lot easier to find joy in life when you wake up each day full of vitality and refreshed from a good night’s sleep . . . the benefits of a clean diet, no alcohol, and lots of physical activity.

It’s also a whole lot easier to wake up early so I can work on my One Little Word project when I am so rested and full of life!

IMG_9002

While the gym is definitely one of my happy places, I am probably happiest in the kitchen.  And this weekend, because the majority of my family’s birthdays happen in January, I found myself in the kitchen all day on Sunday baking birthday cakes and making frosting.  In all, I made 2 four layer cakes and with two different frostings.  The first was a sprinkle cake, for which I am about to share the recipe, and the second was simply the sprinkle cake without the sprinkles.  As for the frosting, I made a simple vanilla frosting for the sprinkle cake and a mocha one for the plain vanilla cake.  I will freely admit that there is nothing nutritionally redeeming about sprinkles, or their appearance in cake.  And while I’m admitting to things, I also used vegetable shortening in my vanilla frosting (yeah, even I was horrified by it) . . .but it made for an excellent frosting that hardened on the outside just that little bit, you know, the way the icing is on a cake from a bakery.  And yes, I did have a slice of cake (the mocha one which didn’t have shortening . . . but cake nonetheless).  And yes, there was a whole lot of joy in that slice of cake!

Vanilla Sprinkle Cake

  • Servings: 6-8
  • Difficulty: easy
  • Print

Ingredients

1 cup butter

1 1/2 cups white sugar

1/2 cup brown sugar

2 eggs

1/2 cup greek yogurt

1 1/2 cups milk (any kind that you have on hand)

2 tbs vanilla extract

2 tsp baking powder

1 tsp baking soda

1 tsp salt

3 1/3 cups flour

1 cup sprinkles (I used the thin round ones, but you could also use the little ones that look like balls – other kinds of sprinkles may bleed too much into the batter)

Directions

  1. Preheat the oven to 350 and butter and flour 2 9″ cake pans.
  2. In the bowl of an electric mixer, cream the butter and two sugars.  Beat until they are well combined.  Add in the eggs and continue to beat until the mixture is light, fluffy, and pale yellow in colour.
  3. Add in the yogurt and mix again.
  4. Measure the milk and vanilla into a bowl.  Measure the flour, baking powder, baking soda, and salt into another bowl.
  5. Add half the milk mixture and half of the flour mixture to the bowl and mix until just combined.
  6. Add in the remaining milk mixture and flour mixture and again, mix until just combined.
  7. Add in the sprinkles and mix on last time.
  8. Distribute the batter between the two pans and use a spatula to even out the batter in the pans.
  9. Bake for 30 minutes and assess how well done the cakes are.  At this point, I put the cakes back in for another 10 minutes.  I then covered the cakes with tin foil and baked them for another 15 minutes until a cake tester inserted into the middle of the cakes came out clean.
  10. If you are making these cakes without the sprinkles, baking time may be reduced by about 10-15 minutes.
  11. I cut each of these cakes in half to make a total of 4 layers!

Simple Vanilla Frosting

  • Servings: ices 1 2-layer cake
  • Difficulty: easy
  • Print

Ingredients

1/2 cup unsalted butter

1/2 cup vegetable shortening

3-4 cups icing sugar

2 tsp vanilla extract

4 tbsp milk or cream

Directions

  1. In the bowl of an electric mixer, beat the butter, shortening and vanilla together until well combined.
  2. Add in 3 cups of the icing sugar as well as the milk.  Mix well.  If the icing is not as thick as you’d like it, add in the remaining cup of icing sugar.  Depending on how “fluffy” you like your frosting, keep beating it until your desired state of fluffiness is reached.
  3. If you are making a 4-layer cake as I did, double this recipe.

The Best of Intentions

At some point over the holidays I came across the concept of writing down an intention each morning before getting out of bed.  Since just before the start of the new year, I’ve been putting this concept into practice.  At some point in the morning, before my day has truly begun, I take a few minutes and write a few lines about what I intend for that day.  Some days it’s an intention about how I want to feel, others it’s about how I want to interact with others, and some days, it’s about what I want to get done in a day.

If you google intention setting, you’ll get loads of hits; I think just about every self-help guru worth their weight has at some point touched on this topic of intention.  And I think I know why now . . . it is a really powerful tool.

Writing intentions (for me anyway) is like making a little promise with yourself; one that you can keep working on as the day progresses.

Writing intentions has also helped me to focus; focus on what is really important.

And most importantly, writing intentions has helped me to let go; let go of what isn’t really that important at all.

I started this September with the lofty goal of creating real structure around the concept of “mommy school” for my kids.  My plan was to cover different themes each month and to really explore these themes with my kids; to investigate topics that aren’t necessarily covered in school.  While this seemed like a fantastic idea in theory (and on paper), my heart just never caught up to where my mind was on this idea.  And so, I have let go of my pre-conceived notions about my mommy school.  Instead, I start each day with the intention of having a meaningful interaction with each of my kids.  Inevitably, there is an educational component to these interactions, but more importantly, we are having fun and really connecting with each other.  Part and parcel with this is that for some time each day, my phone, iPad and computer are all turned off.  The kids are loving the attention, I’m loving the time with them, and we’re all happier for it.  And that . . . well, that’s the power of intention!

Speaking of intention, the Husband and I intended to give up gluten, sugar and alcohol this month.  The most difficult part of this is our Friday night pizza tradition.  This is a tradition the Husband grew up with, and one that we are passing on to our kids.  Friday night often involve a bunch of family / friends / neighbours at our house with a very relaxed night of oder-in pizza and quite often cupcakes from a favourite downtown bakery.  The lack of gluten, sugar and alcohol in our diet makes these Friday nights just a little bit challenging, especially since I love ending off the week with a “treat” dinner.

Last week, as the weather turned cold, I decided to make a comforting dinner for the two of us while the kids had chicken quesadillas.  This green curry turned out amazingly well; it was exactly what I had been craving.  And the best part was that it made enough for 2 meals – so we get to have the leftovers tonight!

Thai Green Curry with Brown Rice

  • Servings: 4-6
  • Difficulty: easy
  • Print

Ingredients

10 boneless skinless chicken thighs cut into bite-sized pieces

4 shallots, finely chopped

4 garlic cloves, minced

Coconut oil

2 cans coconut milk

2 tbsp green curry paste (or more or less depending on how spicy you like things)

3 tbsp tapioca flour

Directions

  1. Heat a large skillet on medium heat and add a dollop of coconut oil to the pan.  Add in the chicken thighs and cook until they are just cooked through.
  2. Remove the chicken from the skillet and drain out any juices that have accumulated in the pan.
  3. Return the pan to the stove and add in another dollop of coconut oil.  Now add in the shallots and garlic and cook until they have softened.  Add the chicken back into the pan along with the coconut milk.  Stir occasionally until the coconut milk comes to a simmer.
  4. At this point, get out a whisk and add in the curry paste and the tapioca flour.  Whisk the mixture until everything is well combined and the sauce has reached the desired consistency (I like this to be nice and thick).

Serve over brown rice, quinoa, or whatever else you’d like to serve it with!


Blog at WordPress.com.

Up ↑

%d bloggers like this: